Hardware Assets
The asset management module tracks IT hardware from procurement through disposal, with maintenance logging, assignment history, warranty tracking, and compliance linking.
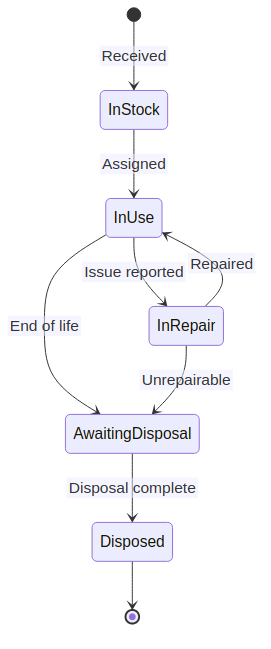
Asset lifecycle states
| State | Description |
|---|---|
| In Stock | Asset received but not yet deployed. Stored at a location. |
| In Use | Assigned to a user or deployed to a location. |
| In Repair | Under maintenance. Automatically tracked via maintenance logs. |
| Awaiting Disposal | Approved for retirement. Pending disposal process. |
| Disposed | Retired. Record preserved for audit purposes. |
Creating an asset
- Navigate to Assets → Asset List.
- Click Add Asset.
- Fill in the required fields: name, asset type, model, serial number.
- Optional fields: purchase date, cost, warranty expiry, supplier, location.
- Assign to a user (optional — can be done later).
- Upload photos or documentation as attachments.
- Save.
The asset is created in In Stock status by default unless assigned to a user.
Assignment and transfers
Assigning an asset to a user:
- Open the asset detail page.
- Click Assign or edit the assignment field.
- Select the user. The status changes to In Use automatically.
- An
AssetAssignmentrecord is created, preserving the assignment history.
Transferring between users:
- Change the assigned user on the asset detail page.
- The previous assignment is closed (end date set) and a new one is created.
- Full assignment history is visible in the asset's timeline.
Warranty tracking
- Set the Warranty Expiry date when creating the asset.
- The dashboard and reports show assets with upcoming warranty expirations.
- Notifications can be configured to alert before expiry.
Custom properties
Assets support custom fields defined at the organization level:
- Navigate to Administration → Configuration → Custom Fields.
- Create a custom field (e.g., "Insurance Policy Number", "BIOS Version").
- The field appears on all asset forms and detail pages.
- Custom fields are searchable via universal search.
Bulk operations
From the asset list view:
- Bulk assign — assign multiple assets to a user or location.
- Bulk export — export filtered asset list as CSV.
- Bulk import — use the CLI data import for initial loading.
Compliance linking
Assets are commonly linked to compliance controls as evidence:
- On the asset detail page, scroll to Compliance Links.
- Click Link to Control.
- Select the framework and control.
- Add context notes explaining how this asset satisfies the control.
Example: linking a laptop with full-disk encryption to ISO 27001 control A.8.1 (Responsibility for assets).